Retain Cycles, Weak and Unowned in Swift

Memory management, retain cycles and the usage of the keywords weak and unowned are a little bit confusing. On the other hand it’s very important to understand this topic properly because retain cycles are one of the major reasons for memory problems. But don’t worry! In this article you will learn everything you need to know.
Hint: This post has been updated to Swift 3 and iOS 10
Contents
We will start by discussing the basics of memory management in Swift. Based on this, we will learn what retain cycles are and how we can avoid them by using the keywords weak and unowned. After that, we will look at two common scenarios where retain cycles can occur. We will conclude this article by discussing two ways to detect retain cycles. As always it’s highly recommended to reproduce all steps in a playground.
[toc]
How does memory management work in Swift?
We start by looking at the basics of memory management in Swift. ARC (automatic reference counting) does most of the memory management work for you, which is very good news. The principle is very simple: By default, each reference, that points to an instance of a class, is a so-called strong reference. As long as there is at least one strong reference pointing to an instance, this instance will not be deallocated. When there’s no strong reference pointing to that instance left, the instance will be deallocated. Let’s take a look at the following example:
class TestClass {

    init() {
        print("init")
    }

    deinit {
        print("deinit")
    }

}

var testClass: TestClass? = TestClass()
testClass = nil
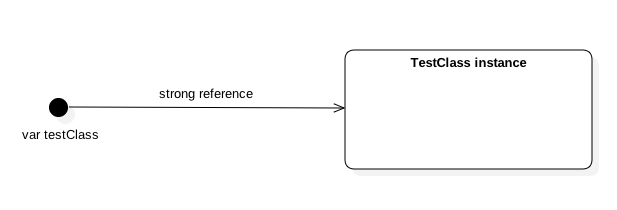
After creating the instance, the situation looks as follows:
testClass has a strong reference to an instance of TestClass. If we now set this reference to nil, the strong reference is gone and since there is no strong reference left, the instance of TestClass gets deallocated:
By the way, if you take a look at the console, you can see that everything is working fine because the deinit method will only be called by the system when the instance gets deallocated:
![]()
If the instance of TestClass was not deallocated, there wouldn’t be the message “deinit”. As we will discuss later, placing a log message inside of deinit is a very good way to observe the deallocation of an object.
What is a retain cycle?
So the principle of ARC works very well and most of the times you don’t have to think about it. However, there are situations where it doesn’t work and you have to help a little bit. Take a look at the following example:
class TestClass {

    var testClass: TestClass? = nil

    init() {
        print("init")

    }

    deinit {
        print("deinit")
    }

}

var testClass1: TestClass? = TestClass()
var testClass2: TestClass? = TestClass()

testClass1?.testClass = testClass2
testClass2?.testClass = testClass1
Again we have a class called TestClass. Now, we create two instances of that class and let these instances point to each other. The situation is visualised in the following picture:
Now let us set our two variables to nil:
testClass1 = nil
testClass2 = nil
But the two instances won’t get deallocated! You can see this because there are not “deinit” messages in the console. Why is this happening? Let’s take a look at the situation:
Each class has lost one strong reference, but there is still one left for each class! This means these instance won’t be deallocated. Even worse, we don’t have any reference to these classes left in our code. This is called a memory leak. If you have several leaks in your app, the memory usage of the app will increase every time you use the app. When the memory usage is to high, iOS will kill the app. That’s the reason why it’s so important to take care of retain cycles. So how can we prevent them?
weak
Using so-called weak references is a way to avoid retain cycles. If you declare a reference as weak, it’s not a strong reference. That means that this reference doesn’t prevent an instance from being deallocated. Let’s change our code and see what happens:
class TestClass {

    weak var testClass: TestClass? = nil //Now this is a weak reference!

    init() {
        print("init")

    }

    deinit {
        print("deinit")
    }

}

var testClass1: TestClass? = TestClass()
var testClass2: TestClass? = TestClass()

testClass1?.testClass = testClass2
testClass2?.testClass = testClass1

testClass1 = nil
testClass2 = nil
After this small change, we have the debugger output we expected in the first place:
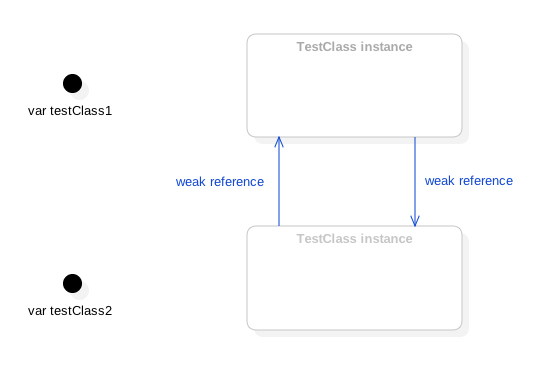
The following picture shows the situation:
Only weak references are left and the instances will be deallocated.
There is another important thing about weak you need to know: After deallocating an instance, the corresponding variable will become nil. This is good because if we access a variable that’s pointing somewhere where no instance is left, there will be a runtime exception. Because only optionals can become nil, every weak variable has to be an optional.
unownend
Besides weak, there is a second modifier that can be applied to a variable: unowned. It does the same as weak with one exception: The variable will not become nil and therefore the variable must not be an optional. But as I explained in the previous paragraph, the app will crash at runtime when you try to access the variable after its instance has been deallocated. That means, you should only use unowned when you are sure, that this variable will never be accessed after the corresponding instance has been deallocated.
Generally speaking it’s always safer to use weak. However, if you don’t want the variable to be weak AND you are sure that it can’t be accessed after the corresponding instance has been deallocated, you can use unowned.
It’s a little bit like using implicitly unwrapped optionals and try!: You can use them, but in almost all cases it’s not a good idea.
Common scenarios for retain cycles: delegates
So what are common scenarios for retain cycles? One very common scenario is the usage of delegates. So image you have a view controllers that has a child view controller. The parent view controller sets himself as the delegate of the child view controller in order to get informed about certain situations:
class ParentViewController: UIViewController, ChildViewControllerProtocol {

    let childViewController = ChildViewController()

    func prepareChildViewController() {

        childViewController.delegate = self
    }

}

protocol ChildViewControllerProtocol: class {

    //important functions...

}

class ChildViewController: UIViewController {

    var delegate: ChildViewControllerProtocol?

}
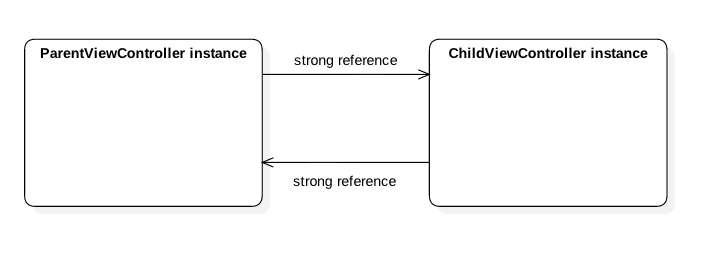
If you are doing it this way, there will be a memory leak due to a retain cycle after popping the ParentViewController:
Instead, we have to declare the delegate property as weak:
weak var delegate: ChildViewControllerProtocol?
By the way, if you are looking at the definition of UITableView, you can see that delegate and dataSource properties are also defined as weak:
weak public var dataSource: UITableViewDataSource?
weak public var delegate: UITableViewDelegate?
So remember that you should in almost all cases declare delegates as weak to prevent retain cycles.
Common scenarios for retain cycles: closures
Closures are another scenario where retain cycles are very likely to occur. Let’s take a look at the following situation:
class TestClass {

    var aBlock: (() -> ())? = nil

    let aConstant = 5


    init() {
        print("init")
        aBlock = {
            print(self.aConstant)
        }
    }

    deinit {
        print("deinit")
    }


}

var testClass: TestClass? = TestClass()
testClass = nil
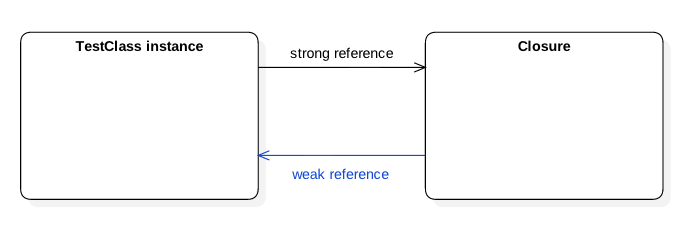
We can see in the logs that the instance of TestClass will not be deallocated. The problem is, that TestClass has a strong reference to the closure and the closure has a strong reference to TestClass:
You can solve this by capturing the self reference as weak:
class TestClass {

    var aBlock: (() -> ())? = nil

    let aConstant = 5


    init() {
        print("init")
        aBlock = { [weak self] in    //self is captured as weak!
            print(self?.aConstant)
        }
    }

    deinit {
        print("deinit")
    }


}

var testClass: TestClass? = TestClass()
testClass = nil
Now the instance will be deallocated as we can see in the logs:
However, there won’t always be a retain cycle when using closure! For example, if you are just locally using the block, there is no need to capture self a weak:
class TestClass {

    let aConstant = 5

    init() {
        print("init")
        let aBlock = {
            print(self.aConstant)
        }
    }

    deinit {
        print("deinit")
    }


}

var testClass: TestClass? = TestClass()
testClass = nil
The reason is, that there is no strong reference to the block, so the block will be deallocated after the method returns. The same holds true when use for example UIView.animateWithDuration:
class TestClass {

    let aConstant = 5

    init() {
        print("init")
    }

    deinit {
        print("deinit")
    }

    func doSomething() {
        UIView.animate(withDuration: 5) {

            let aConstant = self.aConstant

            //fancy animation...
        }
    }


}

var testClass: TestClass? = TestClass()
testClass?.doSomething()
testClass = nil
So if there’s no strong reference to the block, you don’t have to worry about a retain cycle.
You can of course also use unowned instead of weak, and our previous example is indeed a situation were you can do it safely:
class TestClass {

    var aBlock: (() -> ())? = nil

    let aConstant = 5


    init() {
        print("init")
        aBlock = { [unowned self] in
            print(self.aConstant)
        }
    }

    deinit {
        print("deinit")
    }


}

var testClass: TestClass? = TestClass()
testClass = nil
You can do it safely because if TestClass is deallocated so will the block. It can’t happen that the block tries to access the TestClass reference when it’s deallocated. However, in my opinion it’s good practice to use weak even in this situation. It’s a little bit more work because you have to deal with an optional, but it’s always safer.
Detecting retain cycles by using log messages in deinit
After we have learned what retain cycles are and what we can do to avoid them, we have to discuss how we can detect them. My favourite method is using log message in the deinit method. This is probably not a very elegant way to do so, but it’s a very effective one.
deinit {
      print("deinit")
}
If we don’t see the log message in the console although we are expecting the corresponding instance to be deallocated, we know that something is going wrong. It’s especially useful for view controllers – you should really put it in every view controller. For example, when we are popping a view controller, we know that the message should appear. If it does, we know that everything is fine. If it doesn’t, there’s some work to do for you.
Detecting retain cycles by using Instruments
People often talk about using instruments as a good way to detect retain cycle. In fact, I’m not using it very often because the workflow is a little bit special and for me looking at the log messages has the same value. Nevertheless, it’s a lot about personal preferences, so let’s talk about this way.
Image the following situation: We have an app, that has three view controllers and these controllers gets pushed by a navigation controller. So the first view controller pushes view controller two and view controller two pushes view controller three. After tapping the back button twice, we are again on view controller one and expecting the other two view controllers to be deallocated.
For this example I implemented a retain cycle between view controller two and view controller three.
Instrument can display leaks automatically, but unfortunately it’s not always working. But there’s a manual way that’s working very good.
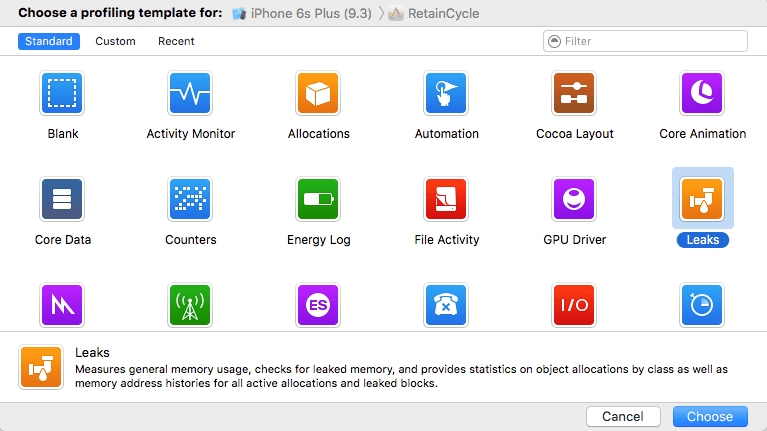
In order for this way to work, you have to ensure that all of your view controller have the same suffix, for example “ViewController” or “VC”. Then we start instruments by choosing “Product -> Profile”. Choose the “Leaks” template:
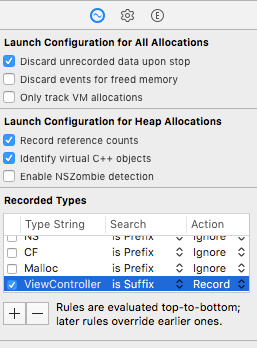
You can see all allocations in the “Allocation summary” area and there is a lot going on. In order to have a much better overview, we add a new record type “ViewController (isSuffix)” in the right panel and remove the check at “*”:
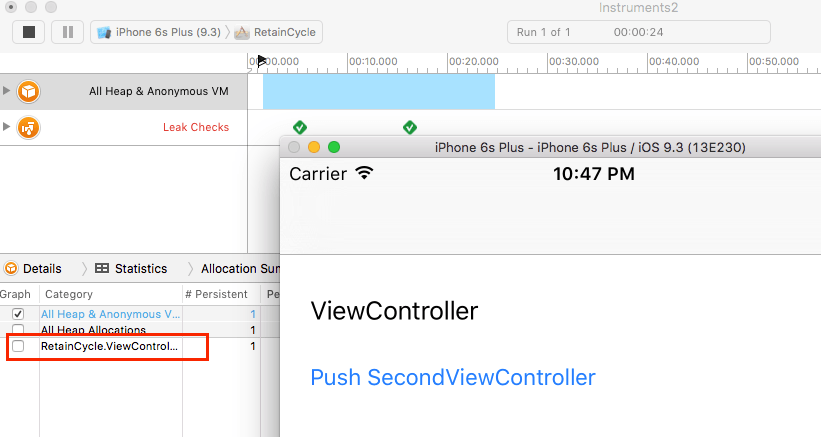
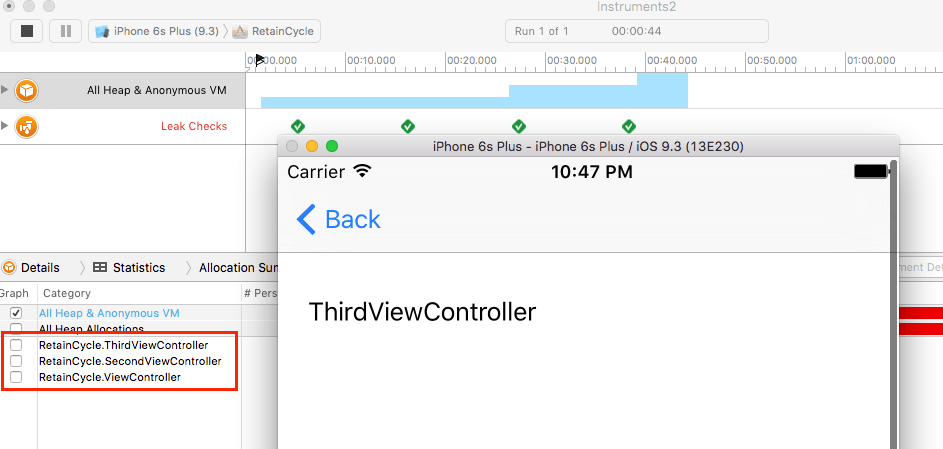
Now it will be much easier. We start the app by pressing the record button. For every view controller that is pushed, a new entry will appear:
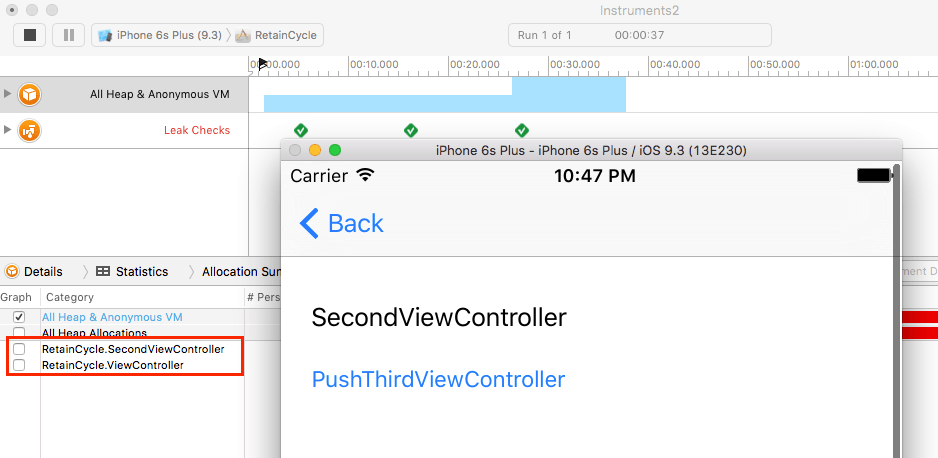
SecondViewController has been pushed:
ThirdViewController has been pushed:
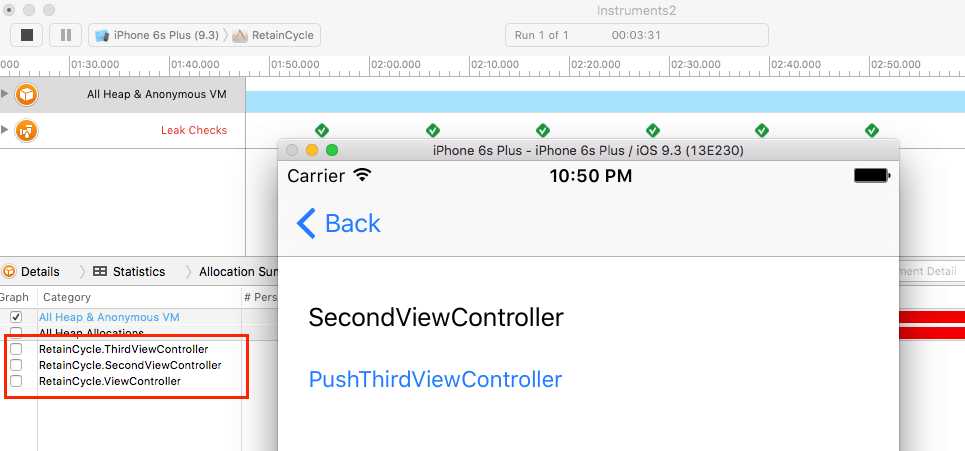
So far, so good. However, after pressing the back button, ThirdViewController is still alive:
This means ThirdViewController hasn’t been deallocated, so we know that something is going wrong and that there’s probably some kind of leak due to a retain cycle.
If all of your view controllers always have the same suffix, you can use this technique to go through the whole app and look for memory leaks.
[thrive_text_block color=”blue” headline=”Summary”]In this article you’ve learned the basics of memory management in Swift, what a retain cycle is and how you can prevent retain cycles to occur. In addition, you’ve learned how you can detect them. This is a lot of stuff and you’ll probably have to read the article a few times to understand all the details. But after applying these ideas to a real app, you will become very familiar with this topic. Please post your comments below.[/thrive_text_block]
References
Image: @ niroworld / shutterstock.com
Swift: weak and unowned
Building Memory Efficient Apps
The Swift Programming Language – Automatic Reference Counting

