UITableView - Tutorial For Beginners


UITableView is one of the most important user interface components on iOS. In this tutorial you will learn all the basics you need to know.
Hint: This post is using iOS 10, Xcode 8.2.1 and Swift 3
On the one hand UITabelView is a very complex component, but on the other hand almost every app uses it. Luckily, is not that difficult to implement an UITableView – especially considering the complexity it provides.
This tutorial has the following content:
[toc]
The whole tutorial is also covered in this video:
Creating an UITableView
Generally speaking, there are two ways for creating an UITableView: You can do it either by using code or you can do it using the interface builder. The last approach is the most common one, so we will do it that way. Furthermore, we will use storyboards. Alternatively, UITableViews can also be created inside XIB files, and it’s almost the same thing. There are small advantages using storyboards for UITableViews though – we will talk about these later.
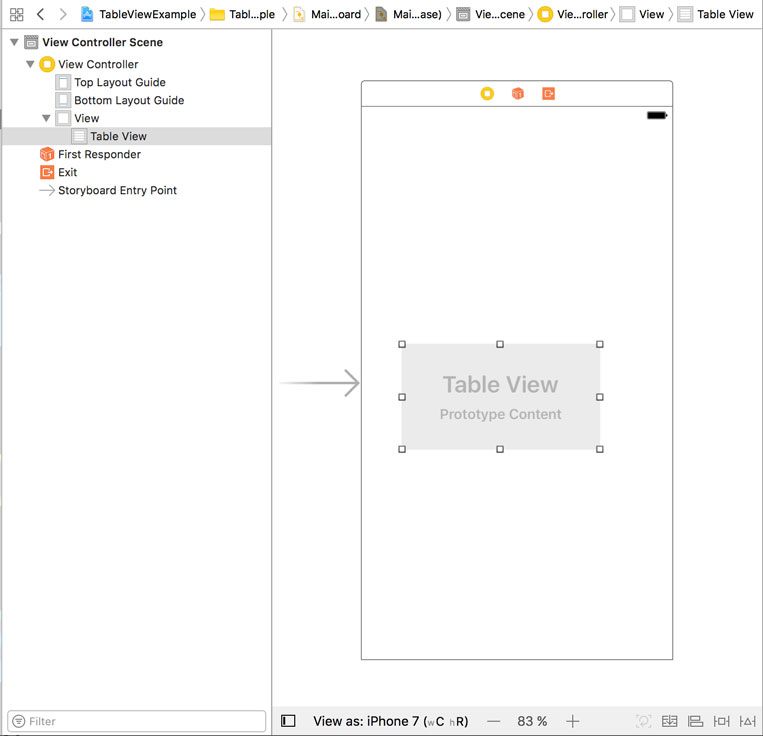
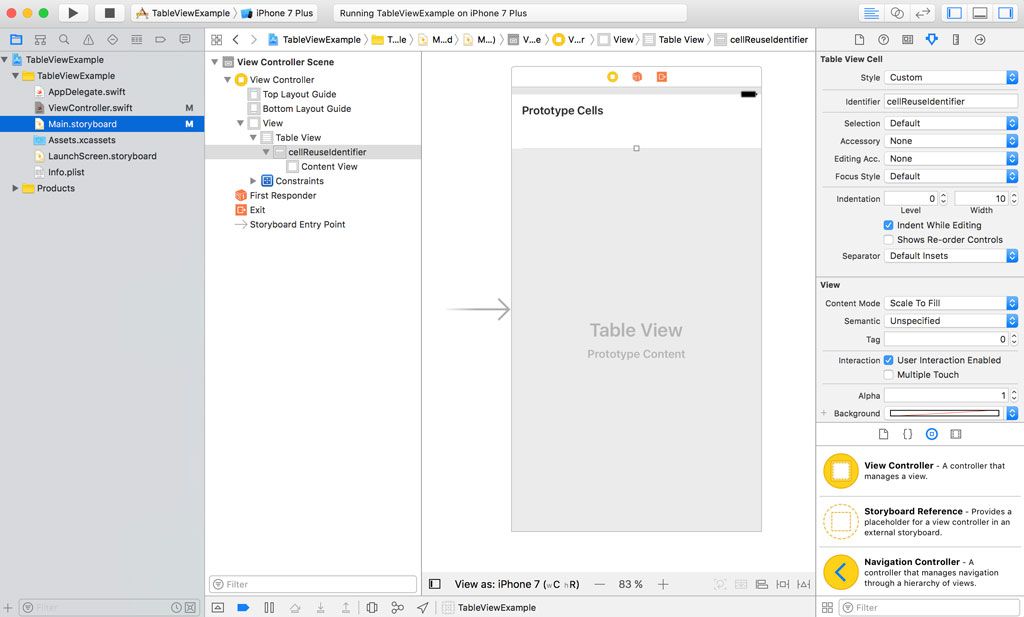
Alright, let’s start: Create a new project, open the storyboard and drag a table view inside the view controller.
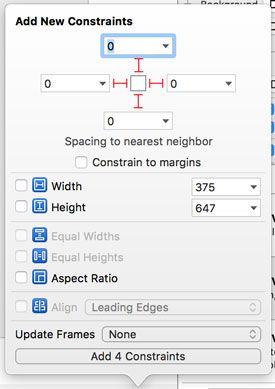
Then we add four constraints to it:
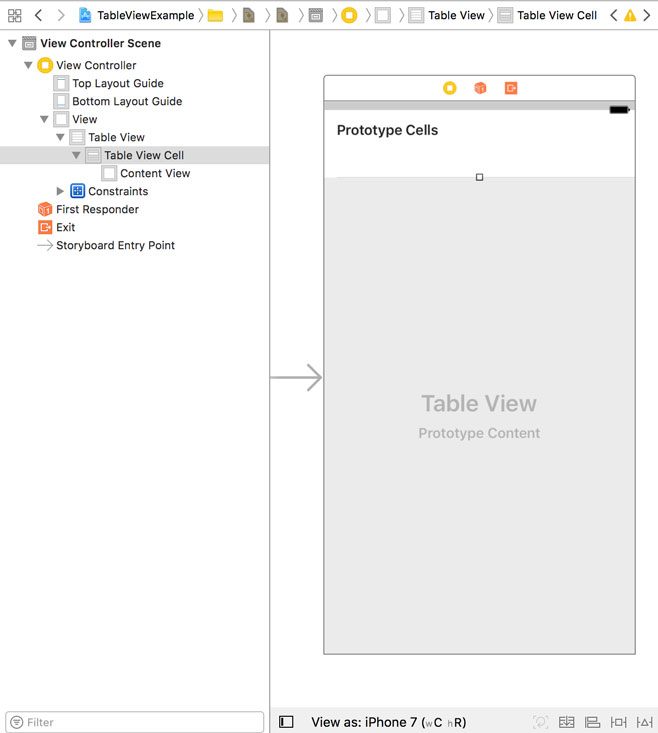
After adding an outlet called tableView, we are almost done. The only thing left is adding a prototype table view cell. For that, just drag and drop an UITableViewCell inside the table view:
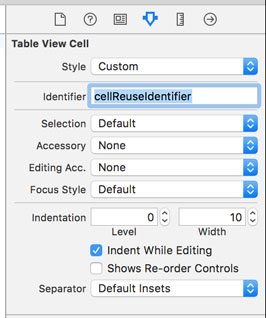
Inside the attributes inspector, we set the identifier (we will talk about the meaning of this identifier later):
Now build and run the app – you can already see the table view!
UITableViewDataSource
At the moment, our UITableView doesn’t do anything, though – there’s no data it could display. So let’s start by telling the UITableView what it should display. This job can be done by any component that confirms to the so-called UITableViewDataSource protocol. In a real world application it can make sense to create a separate object for that, but we will take the most obvious approach in this example and set the view controller the UITableView lives in as its delegate.
If you are using an UITableViewController, that’s already done for you. If not, you can do it in the interface builder or by using code:
tableView.dataSource = self
A good place for that is the viewDidLoad method.
For that, the view controller has to confirm to the UITableViewDataSource protocol:
class ViewController: UIViewController, UITableViewDataSource
Now we have to implement three methods to tell the table view three things:
- How many sections does the table view have?
- How many rows does each section of the table view have?
- How does each cell of the table view look like?
For point number one, we will implement the following method:
func numberOfSections(in tableView: UITableView) -> Int {
    return 1
}
For making things easy, our table view has only one section. However, a table view can have any number of sections.
Next, we will tell the table view how many rows each section has. Our data lives in an array called data, that will be filled in viewDidLoad:
override func viewDidLoad() {
     super.viewDidLoad()

     for i in 0...1000 {
          data.append("\(i)")
     }

     tableView.dataSource = self
}

private var data: [String] = []
In the following method we will return the number of data items:
func tableView(_ tableView: UITableView, numberOfRowsInSection section: Int) -> Int {
     return data.count
}
Since we have only one section, we don’t have to use the variable section.
Now we will create the actual table view cells. The following method will be called for each cell separately:
func tableView(_ tableView: UITableView, cellForRowAt indexPath: IndexPath) -> UITableViewCell {
     let cell = tableView.dequeueReusableCell(withIdentifier: "cellReuseIdentifier")! //1.

     let text = data[indexPath.row] //2.

     cell.textLabel?.text = text //3.

     return cell //4.
}
There are several things happening in this function:
- We create the cell by using a method of UITableView. We have to hand over the so-called reusable identifier, which we have specified in the interface builder before. The table view manages the creation and reusing of table view cells. We will talk about the details later.
- We look up the data item that corresponds to the indexPath. Since we have just one section, we don’t have to care about the section number. If you have more than one section, you can access it through the section property of IndexPath.
- Settings up the cell. In this case, we just have to set one label.
- Returning the cell.
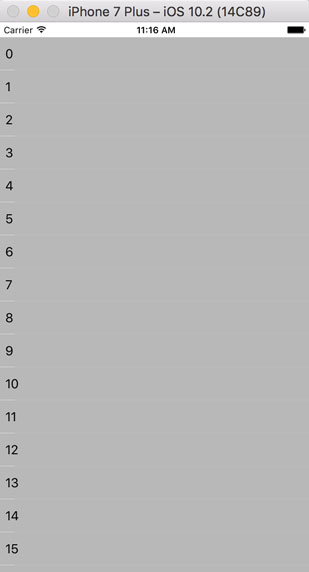
Now the table view already works as expected:
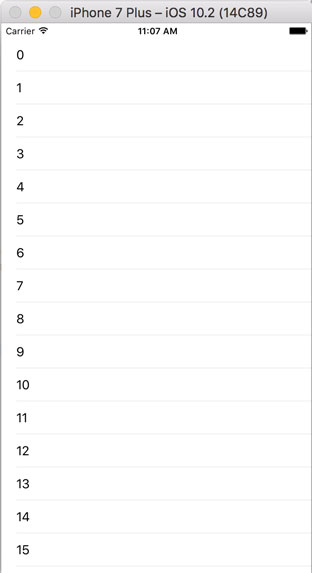
Although we haven’t done a lot, our table view has 1000 rows!
Custom cells
Of course that example is a little bit boring, because UITableViewCell has a very simple design. But it’s actually possible to create a custom table view cell. For that, we have to switch back to the interface builder:
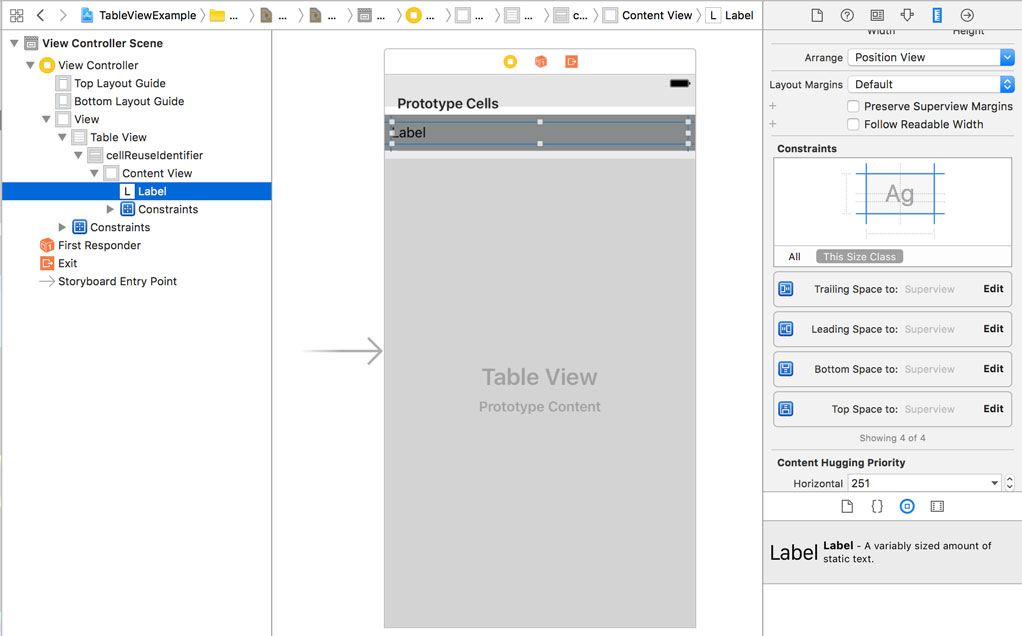
As you can see, there is a so-called prototype cell. This is the starting point for creating a custom cell. We are dragging a label inside the cell and set its background color to gray. Furthermore, we create constraints to all four edges of its superview and set them to 0. Then, it should look as following:
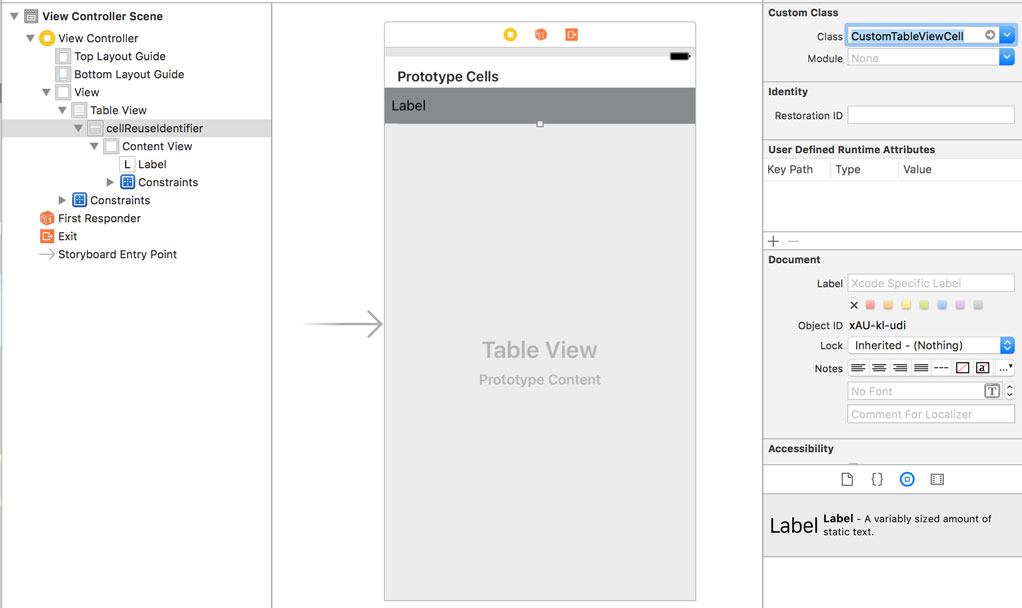
In order to be able to change the behaviour of the cell, we also have to create a subclass of UITableViewCell. For that, we are creating a new class by clicking ‘File -> New -> File…’ and choosing “Cocoa Touch Class”. We call it CustomTableViewCell and let it inherit from UITableViewCell:

After clicking “Next” and “Create”, a new class appears inside the project navigator. Now, we go back to the storyboard and set our new class as the class of the prototype cell:
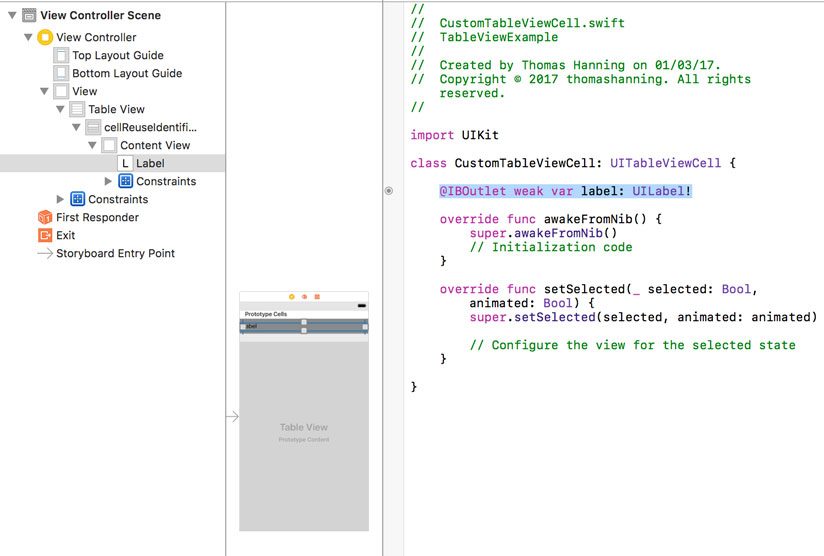
Switch to the assistant editor, choose CustomTableViewCell.swift, and set an outlet for the label:
Now we can use that cell inside our tableview controller:
func tableView(_ tableView: UITableView, cellForRowAt indexPath: IndexPath) -> UITableViewCell {
     let cell = tableView.dequeueReusableCell(withIdentifier: "cellReuseIdentifier") as! CustomTableViewCell

     let text = data[indexPath.row]

     cell.label.text = text

     return cell
}
Note that we are downcasting to CustomTableViewCell. It’s okay to make a hard downcast by using as! because this either fails always or never. And if it always failed, we would notice it at development time.
The result looks as expected:
If the table view is not defined inside a storyboard but inside a XIB file, it’s not possible to create a prototype cell directly in the table view. Instead, you have to create a separate XIB file for the table view cell and register it inside viewDidLoad:
tableView.register(UINib(nibName: "CustomTableViewCell", bundle: nil), forCellReuseIdentifier: "cellReuseIdentifier")
As I’ve mentioned already in previous posts, there are good reason for both using storyboard and not using storyboards. So it’s good to know these differences.
UITableViewDelegate
Although the table view is already working as expected, there is not a lot of interaction possible. In order to achieve that, we can implement specific methods of the UITableViewDelegate. As with the UITableViewDataSource, we first have to set the view controller as the tableview’s delegate:
tableView.delegate = self
Of course the view controller has to implement this protocol:
class ViewController: UIViewController, UITableViewDataSource, UITableViewDelegate
There are many things you can do with UITableViewDelegate:
- Managing accessory view
- Managing selections
- Modifying the header and footer of sections
- Editing table rows.
- Managing table view highlight
And many more! Since this is just an introduction tutorial, we will just talk about managing selections. For further details take a look at the UITableViewDelegate reference.
Managing selections
So in almost all cases we want to react to a tap on a table view cell. In this case we will show an alert. We will do that by implementing the following method:
func tableView(_ tableView: UITableView, didSelectRowAt indexPath: IndexPath) {

     let alertController = UIAlertController(title: "Hint", message: "You have selected row \(indexPath.row).", preferredStyle: .alert)

     let alertAction = UIAlertAction(title: "Ok", style: .cancel, handler: nil)

     alertController.addAction(alertAction)

     present(alertController, animated: true, completion: nil)

}
As you can see, it’s very straightforward to implement this behavior.
UITableViewController
You may have already noticed that there is also UITableViewController, but we haven’t used it in this tutorial. So what is an UITableViewController? It’s a component that inherits from UIViewController and that is already configured for using a table view: It has an UITableView and both the delegate and data source are set. Also if you create a new UITableViewController, all the important delegate and data source methods are already in the source code. So in a way it’s easier to use that component instead of configuring it on your own. But in order to understand how an UITableView works, we have taken the manual approach in this tutorial.
The most common mistake in using UITableView
Although it’s not that difficult to implement an UITableView, there’s one thing that is difficult to understand and that could create some wired bugs. First, let’s discuss how a table view actually works:
In fact, not the whole table will be loaded initially. That’s a good thing because – depending on the data – the table view can have a lot of cells – even thousands of cells. And that’s an amount that could create both a heavy memory pressure and a performance hit. In order to avoid that, iOS just loads the cells that are actually displayed and a few cells more to guarantee a smooth scrolling behavior. On the other hand, cells that disappear will not be unloaded but will be reused. All in all, just a few cells will be initialized.
But if you don’t set all properties every time, the content of other cells will be displayed! Let’s simulate this by setting the background color of the cells to red for every second cell:
func tableView(_ tableView: UITableView, cellForRowAt indexPath: IndexPath) -> UITableViewCell {
     let cell = tableView.dequeueReusableCell(withIdentifier: "cellReuseIdentifier") as! CustomTableViewCell

     let text = data[indexPath.row]

     cell.label.text = text

     if indexPath.row % 2 == 0 {
            cell.contentView.backgroundColor = UIColor.red
     }

     return cell
}
After starting the app, everything looks as aspected:

However, after scrolling a little bit, more and more red cells appear:

A very confusing bug! To prevent this, we also have to set the background color in the other cases:
func tableView(_ tableView: UITableView, cellForRowAt indexPath: IndexPath) -> UITableViewCell {
     let cell = tableView.dequeueReusableCell(withIdentifier: "cellReuseIdentifier") as! CustomTableViewCell

     let text = data[indexPath.row]

     cell.label.text = text

     if indexPath.row % 2 == 0 {
          cell.contentView.backgroundColor = UIColor.red
     } else {
          cell.contentView.backgroundColor = UIColor.lightGray
     }

     return cell
}
And now, everything works as aspected:

For more details about this topic, take a look at this blog post.
References
UITableView reference
UITableViewDataSource reference
UITableViewDelegate reference
The most common mistake in using UITableView
UITableView: Automatic Row Height
Image: @ Mizin Roman / shutterstock.com